Technology
Troubleshooting - HP M507
Last modified 6/24/2024
- Control Panel Help System
- Printer Does Not Pick Up Paper or Misfeeds
- Clear paper jams
- Introduction
- Printer Jam Locations
- Auto-navigation for clearing paper jams
- Experiencing frequent or recurring paper jams?
- Clear paper jams in tray 1—13.A1
- Clear paper jams in tray 2, tray 3, tray 4, tray 5—13.A2, 13.A3, 13.A4, 13.A5
- Clear paper jams in the output bin—13.E1
- Clear paper jams in the duplexer
- Clear paper jams in the toner-cartridge area
- Clear paper jams in the fuser—13.B9, 13.B2, 13.FF
Control Panel Help System
The printer has a built-in Help system that explains how to use each screen. To open the Help system, touch the Help (?) button on the control panel.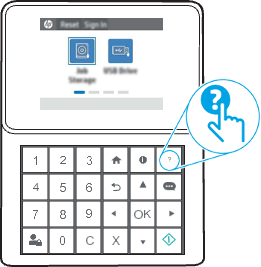

For some screens, the Help opens to a global menu where you can search for specific topics. You can browse through the menu structure by touching the buttons in the menu. Some Help screens include animations that show specific procedures, such as clearing paper jams.
If the printer alerts of an error or warning, touch the Help button to open a message that describes the problem. The message also contains instructions to help solve the problem.
Printer Does Not Pick Up Paper or Misfeeds
Introduction
The following solutions can help solve problems if the printer is not picking up paper from the tray or is picking up multiple sheets of paper at one time. Either of these situations can result in paper jams.
The Printer Does Not Pick Up Paper
If the printer does not pick up paper from the tray, try these solutions.
- Open the printer and remove any jammed sheets of paper. Verify that no torn remnants of paper remain inside the printer.
- Load the tray with the correct size of paper for the job.
- Make sure the paper size and type are set correctly on the printer control panel.
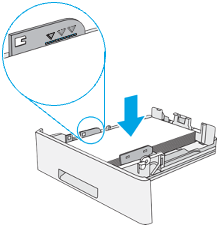
- Make sure the paper guides in the tray are adjusted correctly for the size of paper. Adjust the guides to the appropriate indentation in the tray. The arrow on the tray guide should line up exactly with the marking on the tray.
NOTE: Do not adjust the paper guides tightly against the paper stack. Adjust them to the indentations or markings in the tray.
The following images show examples of the paper-size indentations in the trays for various printers. Most HP printers have markings similar to these.
Size markings for Tray 1 or the multipurpose tray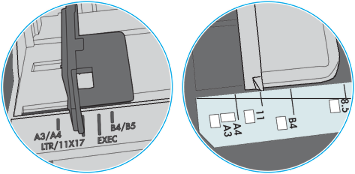
Size markings for cassette trays
- Verify that the humidity in the room is within specifications for this printer and that paper is being stored in unopened packages. Most reams of paper are sold in moisture-proof wrapping to keep paper dry.
In high-humidity environments, paper at the top of the stack in the tray can absorb moisture, and it might have a wavy or uneven appearance. If this happens, remove the top 5 to 10 sheets of paper from the stack.
In low-humidity environments, excess static electricity can cause sheets of paper to stick together. If this happens, remove the paper from the tray, and flex the stack by holding it at each end and bringing the ends up to form a U shape. Then, rotate the ends down to reverse the U shape. Next, hold each side of the stack of paper, and repeat this process. This process releases individual sheets without introducing static electricity. Straighten the paper stack against a table before returning it to the tray.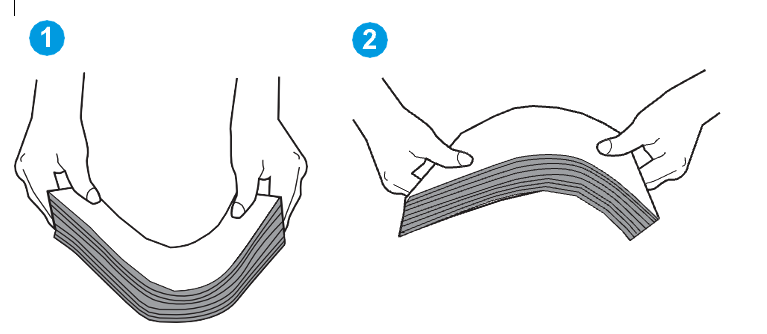
- Check the printer control panel to see if it is displaying a prompt to feed the paper manually. Load paper, and continue.
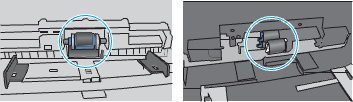
- The rollers above the tray might be contaminated. Clean the rollers with a lint-free cloth dampened with warm water. Use distilled water, if it is available.
CAUTION: Do not spray water directly on to the printer. Instead, spray water on the cloth or dab the cloth in water and wring it out before cleaning the rollers.
The following image shows examples of the roller location for various printers.
The Printer Picks Up Multiple Sheets of Paper
If the printer picks up multiple sheets of paper from the tray, try these solutions.
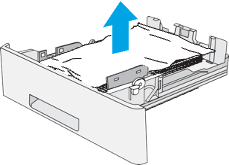
- Remove the stack of paper from the tray and flex it, rotate it 180 degrees, and flip it over. Do not fan the paper. Return the stack of paper to the tray.
NOTE: Fanning the paper introduces static electricity. Instead of fanning the paper, flex the stack by holding it at each end and bringing the ends up to form a U shape. Then, rotate the ends down to reverse the U shape. Next, hold each side of the stack of paper, and repeat this process. This process releases individual sheets without introducing static electricity. Straighten the paper stack against a table before returning it to the tray. - Use only paper that meets HP specifications for this printer.
- Verify that the humidity in the room is within specifications for this printer, and that paper is being stored in unopened packages. Most reams of paper are sold in moisture-proof wrapping to keep paper dry.
In high-humidity environments, paper at the top of the stack in the tray can absorb moisture, and it might have a wavy or uneven appearance. If this happens, remove the top 5 to 10 sheets of paper from the stack.
In low-humidity environments, excess static electricity can cause sheets of paper to stick together. If this happens, remove the paper from the tray, and flex the stack as described above. - Use paper that is not wrinkled, folded, or damaged. If necessary, use paper from a different package.
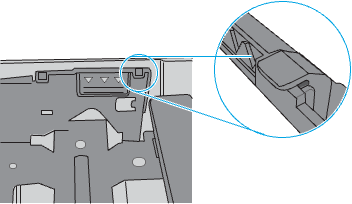
- Make sure the tray is not overfilled by checking the stack-height markings inside the tray. If it is overfilled, remove the entire stack of paper from the tray, straighten the stack, and then return some of the paper to the tray.
The following images show examples of the stack-height markings in the trays for various printers. Most HP printers have markings similar to these. Also make sure that all sheets of paper are below the tabs near the stack-height marks. These tabs help hold the paper in the correct position as it enters the printer.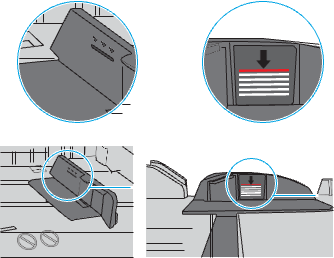
- Make sure the paper guides in the tray are adjusted correctly for the size of paper. Adjust the guides to the appropriate indentation in the tray. The arrow on the tray guide should line up exactly with the marking on the tray.
NOTE: Do not adjust the paper guides tightly against the paper stack. Adjust them to the indentations or markings in the tray.
The following images show examples of the paper-size indentations in the trays for various printers. Most HP printers have markings similar to these.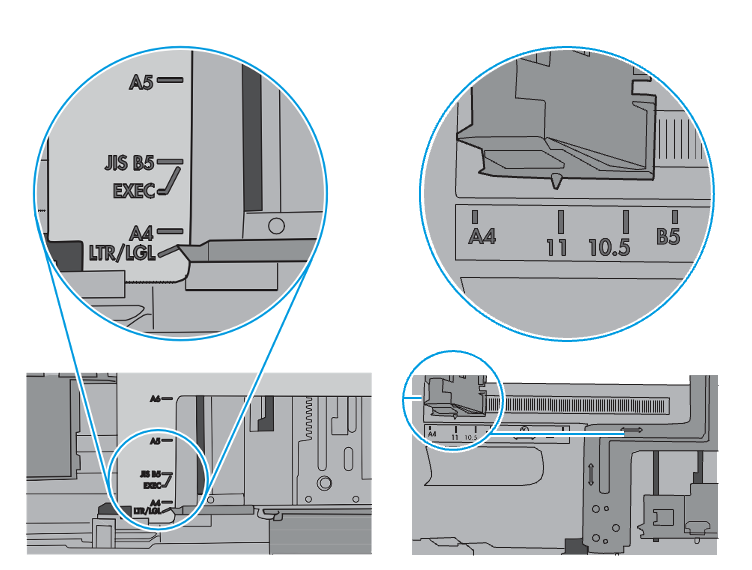

- Make sure the printing environment is within recommended specifications.
Clear paper jams
Introduction
The following information includes instructions for clearing paper jams from the printer.
Printer Jam Locations
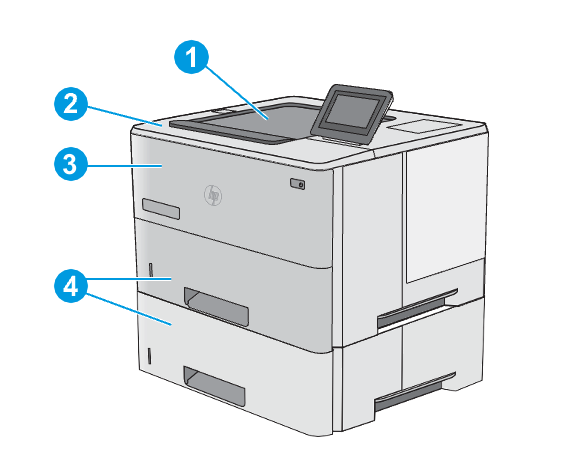
- Output bin
- Top cover and toner-cartridge area
- Tray 1
- Tray 2 and the optional 1 x 550-sheet feeders
NOTE: Remove Tray 2 to access jams in the duplexer.
Auto-navigation for clearing paper jams
The auto-navigation feature assists in clearing jams by providing step-by-step instructions on the control panel. When you complete a step, the printer displays instructions for the next step until you have completed all steps in the procedure.
Experiencing frequent or recurring paper jams?
To reduce the number of paper jams, try these solutions.
- Use only paper that meets HP specifications for this printer.
- Use paper that is not wrinkled, folded, or damaged. If necessary, use paper from a different package.
- Use paper that has not previously been printed or copied on.
- Make sure the tray is not overfilled. If it is, remove the entire stack of paper from the tray, straighten the stack, and then return some of the paper to the tray.
- Make sure the paper guides in the tray are adjusted correctly for the size of paper. Adjust the guides so they are touching the paper stack without bending it.
- Make sure that the tray is fully inserted in the printer.
- If you are printing on heavy, embossed, or perforated paper, use the manual feed feature and feed sheets one at a time.
- Open the Trays menu on the printer control panel. Verify that the tray is configured correctly for the paper type and size.
- Make sure the printing environment is within recommended specifications.
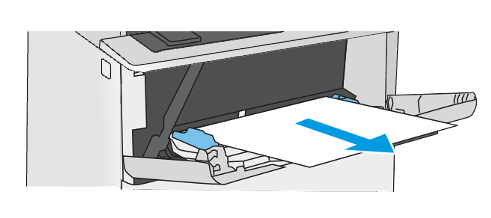
Clear paper jams in tray 1—13.A1
Use the following procedure to clear paper jams in Tray 1. When a jam occurs, the control panel displays an animation that assists in clearing the jam.
- If most of the sheet of paper is visible in the tray, slowly pull the jammed paper out of the printer. Make sure that the entire sheet is removed. If it tears, continue with the following steps to find the remnants. If most of the sheet of paper has been pulled inside the printer, continue with the following steps.
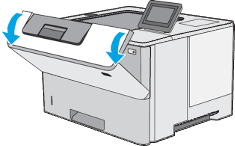
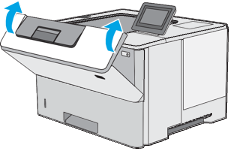
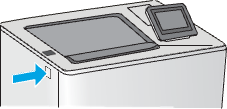
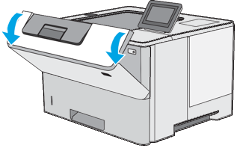
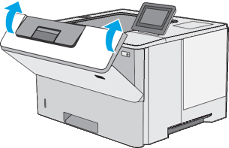
- Press the top-cover-release button on the left side of the printer.

- Open the front door.
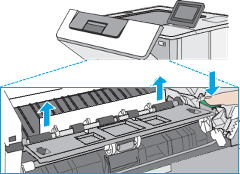
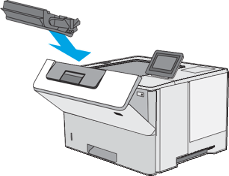
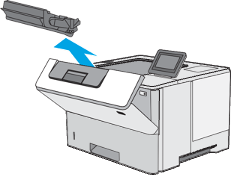
- Remove the toner cartridge

- Lift the jam-access cover and slowly remove any jammed paper. Be careful not to tear the paper.

- Reinsert the toner cartridge.

- Close the front door.
Clear paper jams in tray 2, tray 3, tray 4, tray 5—13.A2, 13.A3, 13.A4, 13.A5
Use the following procedure to check for paper in all possible jam locations related to Tray 2 and the 550-sheet trays. When a jam occurs, the control panel displays an animation that assists in clearing the jam.
- Remove the tray from the printer.

- Remove the paper from the tray and discard any damaged paper.
- Verify that the rear paper guide is adjusted to the indentation for the correct paper size. If necessary, pinch the release and move the rear paper guide to the correct position. It should click into place.
- Load the paper into the tray. Make sure that the stack is flat at all four corners and that the top of the stack is below the maximum-height indicators.
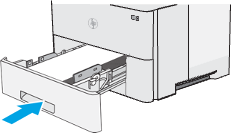
- Reinsert and close the tray.

- Press the top-cover-release button on the left side of the printer.
- Open the front door.

- Remove the toner cartridge.

- Lift the jam-access cover and slowly remove any jammed paper. Be careful not to tear the paper.
- Reinsert the toner cartridge.
- Close the front door.

Clear paper jams in the output bin—13.E1
Use the following procedure to check for paper in all possible jam locations in the output bin. When a jam occurs, the control panel displays an animation that assists in clearing the jam.
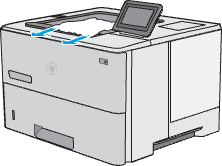
- If paper is visible in the output bin, grasp the leading edge and remove it.
Clear paper jams in the duplexer
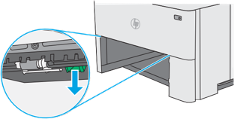
- Remove Tray 2 from the printer.

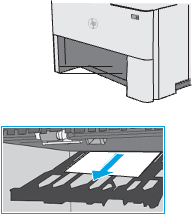
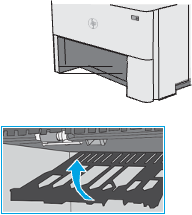
- Pull forward on the green tab inside the tray area to release the duplex pan
- Remove any jammed paper
- Close the duplex pan
- Reinsert and close the tray
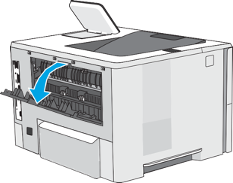
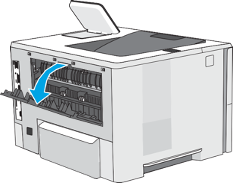
- Open the rear door
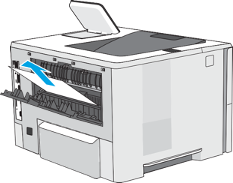
- Remove any jammed paper

- Close the rear door

- Press the top-cover-release button on the left side of the printer.

- Open the front door.
- Remove the toner cartridge
- Lift the jam-access cover and slowly remove any jammed paper. Be careful not to tear the paper.

- Reinsert the toner cartridge

- Close the front door.
Clear paper jams in the toner-cartridge area
Use the following procedure to check for paper in all possible jam locations in the toner-cartridge area. When a jam occurs, the control panel displays an animation that assists in clearing the jam.
- Press the top-cover-release button on the left side of the printer.
- Open the front door.
- Remove the toner cartridge
- Lift the jam-access cover and slowly remove any jammed paper. Be careful not to tear the paper.
- Reinsert the toner cartridge.
- Close the front door.
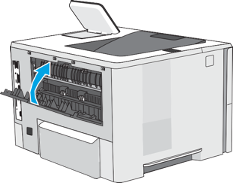
Clear paper jams in the fuser—13.B9, 13.B2, 13.FF
Use the following procedure to clear paper jams in the rear door and fuser area. When a jam occurs, the control panel displays an animation that assists in clearing the jam.
- Open the rear door.
- Remove any jammed paper.
- Close the rear door.