Technology
Submit an Incident Details Report and Injury Details Report
Last modified 11/21/2024
Learn how to submit an incident details report and injury details report in cases of workplace injury or accidents in iPeople.
Although they are two separate reports, they are connected to each other. Complete the incident details report, then the injury details report to connect the two reports. However, the injury details report can be completed at a different time. To connect the injury details report to the corresponding incident details report, simply enter the number of the incident details report prior to filling out the injury details report.
How to Complete the Incident Details Report
- Log in to iPeople at hcm.illinoisstate.edu via Central Login.
- For more information about Central Login at ISU, please refer to: Central Login
- After logging in, your homepage will open.
- Click the Accident Reporting tile.
- If a new report is being created for the first time, click the Add a New Value An incident number field is first assigned with “0” in the Incident Number field.
- Once the incident details report has been completed, an incident number will be assigned. Click the Add button.
- There are six tabs at the top of the screen: Incident, Notification, Description, Location, People, and Reporting. However, information will only be entered into the first five tabs. The Reporting tab will not be used for this process.
- The first tab is the Incident tab. Enter the preliminary information regarding the incident. The fields that require information are marked with an asterisk:
Incident Date – Enter the date the incident occurred using the mm/dd/yyyy format. Alternatively, click on the calendar icon located to the right of the date field and select the date using the calendar.
Incident Time – Enter the time that the incident occurred using the “HH:MM AM/PM” format.
Time Zone – Select the time zone of the location where the incident took place using the dropdown menu.
Time Undetermined – If the time is unknown, select the checkbox next to the Time Undetermined field.
Regulatory Region – This field indicates the country in which the incident occurred. This field is auto-filled with USA.
Incident Type – Using the dropdown menu in the Incident Type field, select the type of incident that is being reported. The choices are: Employee Incident, Employee Off-Duty Incident, Non-Employee Incident, Student Incident, and Vehicle/Equipment Incident.
Is This a Recurrence: Select this checkbox if this incident is a recurring injury.
Resulted in Injury or Illness: Select this checkbox if this incident resulted in injury or illness.
Investigated: Select this checkbox if the incident has been investigated.
The second tab is the Notification tab. Reporting information regarding the incident is entered in this tab. There are two sections in this tab: Incident Notification and Incident Tracking:
Incident Notification- Date Reported – In the Date Reported field, the date the incident was reported is autofilled. If different, edit the date using the mm/dd/yyyy format or click on the calendar icon located to the right of the date field and select the date using the calendar.
- Time Reported – In the Time Reported field, enter the time that the incident was reported in this field using the “HH:MM AM/PM” format.
- Reported To Empl ID – In the Reported To Empl ID field, enter the Empl ID of the supervisor. To enter the Empl ID in this field, click the lookup button located to the right of the field.
In the pop-up window that appears, enter identifying information of the person’s Empl ID you would like to enter. In the Search Results field, click on the person’s name. This will close the window.- Reported by Empl ID – In the Reported By Empl ID field, enter the Empl ID of the person who reported the incident (the injured employee).
To enter the Empl ID in this field, click the lookup button located to the right of the field. In the pop-up window that appears, enter identifying information of the person’s Empl ID you would like to enter. In the Search Results field, click on the person’s name. This will close the window.- Reported By Non-Empl ID – If the incident was reported by a non-employee, enter the non-employee ID in this field.
Incident Tracking
- Date Recorded – In the Date Recorded field, enter the date that the incident was reported.
- Time Recorded – In the Time Recorded field, enter the time that the incident was recorded using the “HH:MM AM/PM” format.

- The third tab is the Description Enter a description of the incident in this tab.
In the Description field, enter a description of the incident. This is a freeform field.
- The fourth tab is the Location tab. This tab is used to enter information regarding where the incident took place.
Location Set ID – The Location Set ID will have the default of “ILSTU.” If blank, enter ILSTU.
Location – Click the lookup button. The Look Up Location window will appear. Choose the location, which will close this window and the location will appear in the Location.
*NOTE: There are multiple options, but MAIN (Main Campus) will most likely be used.Establishment ID – The Establishment ID will have the default of “ILSTU.” If blank, enter ILSTU.
Building/Space Name - Click the lookup button. The Look Up Building/Space Name window will appear. Choose the Building/Space Name, which will close this window and the building/space name will appear in the Building/Space Name field.

Room Location display name - Click the lookup button. The Look Up Room Location display name window will appear. Choose the Room Location display name, which will close this window and the room location display name will appear in the Room Location display name field.

Exact Location – Enter the exact location of the incident in this field. In this textbox, write information detailing where in the building and room the incident took place.
For example, if the incident took place in “108-Fan Room” (Room Location display name) in “Watterson Tower South” (Building/Space Name), the Exact Location could include information such as South End Packer on Ground Level.

- The fifth tab is the People tab. The information in this tab defaults to the injured employee. However, this tab can be used if there are witnesses or other people involved.
- Empl ID or Non-Empl ID: Enter the Empl ID or Non-Empl ID of the witness/other person in this field. Use the lookup button if the Empl ID or Non-Empl ID is unknown.

- Role: The Role of the witness/other person will be automatically generated based on their role in iPeople. Use the dropdown menu to select a different role.

- Witness Confirmation: If the chosen Role is “Witness,” the Witness Confirmation dropdown menu will become available to be used. Choose from the following options:
- Confirms statements
- Does not confirm statement
- Unknown confirmation
- Empl ID or Non-Empl ID: Enter the Empl ID or Non-Empl ID of the witness/other person in this field. Use the lookup button if the Empl ID or Non-Empl ID is unknown.

- Comment: Add any additional comments to this field.

After completing all the necessary fields in this tab, click the Save button to save your changes.
After entering information into the incident details report, navigate to the Injury Details report page to fill out the report and link it to the incident details report that was just completed.
To learn how to enter information into the injury details report, scroll down to the Injury Details Report section.
How to Edit the Incident Details Report
If an Incident Details report needs to be edited or updated after being saved, follow these next steps.
- On the upper left side of the screen, click the Incident Details link. This will open the Incident Details page.

- Search for the incident to update using the search fields in the Find an Existing Value tab. Click the Search button.

- A list of incidents will appear below the Search Criteria in the Search Results field.
- Click on the row of the incident to edit.
- The Incident Details page for the incident will open. Update this page with any edits or changes as needed.
Once completed, click the Save button to save your changes.
Video Demonstration
The following video is the "How to Create the Injury Details" video. The video demonstrates the steps listed above:
How to Complete the Injury Details Report
- Navigate to the Injury Details page. This will link to the Incident Details report that was just completed.
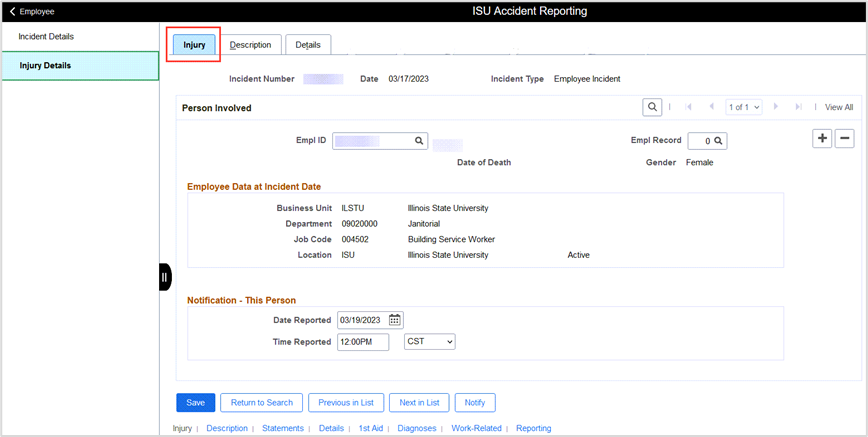
In the upper left of the screen, click Injury Details. - There are three tabs at the top of the screen: Injury, Description, and Details.
- The first tab is the Injury tab. Enter information regarding the person with the injury in this tab:
- Person Involved:
Empl ID: Enter the Empl ID for the person with the injury. If you do not know the Empl ID, click the lookup button to the right of the field.
In the pop-up window that appears, search for the employee using the search fields at the top of the screen. Click the Look Up button.
Locate the employee in the Search Results that appear. Click on the employee’s row. This will close the window and the Empl ID will be now entered into the Empl ID field.
Non-Empl ID: Follow the above steps to enter the Non-Empl ID if the person is not an employee.- Empl Record: Click in this field to autofill the data for the Employee Data at Incident Date section below. The “0” indicates that the system will autofill the Employee Data at Incident Date section based on the employee’s main position at the university. If the employee has multiple positions, click the lookup button and select the position the employee had during the incident. This will autofill the Employee Data at Incident Date section below.
- Employee Data at Incident Date: The Business Unit, Department, Job Code, and Location of the employee during the incident will be autofilled based on the value in the Empl Record
- Notification – This Person:
- Date Reported: Enter the date the injury was reported in this field using the mm/dd/yyyy format. Alternatively, click on the calendar icon to the right of the field and click on the date the injury was reported. This will enter the date in the field.
- Time Reported: Enter the time the injury was reported in this field using the “HH:MM AM/PM” format. The time zone is default set to CST. If this needs to be changed, use the dropdown menu to set the new time zone.
- Person Involved:
- The next tab is Description. Enter information describing the injury in this tab:
Primary Outcome: There are three choices for type of incident in this field: Injury, Illness, and Death. Select the radio button next to the type of incident.
Treatment Required: There are four choices for the type of treatment given to the injury: medical treatment, first aid, hospitalized, and not required. Select the radio button next to the treatment type.
Injury/Illness Details: This is a freeform field. Enter any additional details about the injury in the space provided.
- The final tab is the Details tab. More specific information about the injury can be entered here.

- The first section in the Details tab is the Injury Description section:
Body Parts: Indicate the body part that received the injury.
Click the Body Parts link.
In the Look Up Body Part window that appears, enter the code for the body part in the Body Part field. Alternatively, click the lookup button in this field and select the body part from the list that appears in the Look Up Body Part window.
For this example, select wrist. This will close the window.
In the Side of Body field, select the side of the body the injury occurred using the dropdown menu.
Select the checkbox in the Primary Injury field to indicate that this is for the primary injury.
Nature of Injury: Indicate the nature of the injury.
Click the Nature of Injury link.
In the Look Up Nature of Injury window that appears, enter the code for the nature of the injury in the Nature of Injury field. Alternatively, click the lookup button in this field and select the nature of the injury from the list that appears in the Look Up Nature of Injury window.
For this example, select fracture. This will close the window.
Select the checkbox in the Primary Injury field to indicate that this is for the primary injury.
Select the checkbox in the Privacy Case field to indicate that this case is private.
Source of Injury: Enter the source of the injury.
Click the Source of Injury link.
In the Look Up Source of Injury window that appears, enter the code for the source of the injury (what caused the injury) in the Source of Injury field, Alternatively, click the lookup button in this field and select the injury source from the list that appears in the Look Up Source of Injury window.
For this example, select other. This will close the window.
Select the checkbox in the Primary Injury field to indicate that this is for the primary injury.
Accident Type: Enter the type of accident that caused the injury.
Click the Accident Type link.
In the Look Up Accident Type window that appears, enter the code for the type of accident that occurred in the Accident Type field. Alternatively, click the lookup button in this field and select the injury source from the list that appears in the Look Up Accident Type window.
For this example, select contact with. This will close the window.
Select the checkbox in the Primary Injury field to indicate that this is for the primary injury.
Unsafe Act: Enter the act that caused the injury.
Click the Unsafe Act link.
In the pop-up window that appears, enter the code for the type of unsafe act that caused the injury in the Unsafe Act field. Alternatively, click the lookup button in this field and select the unsafe act from the list that appears in the new pop-up window.
For this example, select no contributing unsafe act. This will close the window.
Select the checkbox in the Primary Injury field to indicate that this is for the primary injury.
Primary Injury Details: A summary of all the selections made in the Injury Description section can now be viewed in this section.
Scroll to the bottom of the screen. Click the Save button.

Video Demonstration
The following video is the "How to Create the Incident Details" video. The video demonstrates the steps listed above:
Editing the Injury Details Report
If an Injury Details report needs to be edited or updated after being saved, follow these steps.
- On your homepage, click the Accident Reporting tile.
- In the upper left of the screen, click Injury Details.
- Search for the incident to update using the search fields in the Find an Existing Value tab.
- For this example, the Empl ID of the employee who is reporting the incident is entered in the Reported By Empl ID field.
- A list of incidents will appear in the Search Results field. Click on the row of the report to edit.
- The Injury Details page for the incident will open. Update this page with any edits or changes as needed.
Once completed, click the Save button to save your changes.
How to Get Help
Technical assistance is available through the Illinois State University Technology Support Center at:
- Phone: (309) 438-4357
- Email: SupportCenter@IllinoisState.edu
- Submit a Request via Web Form: Help.IllinoisState.edu/get-it-help
- Live Chat: Help.IllinoisState.edu/get-it-help