Technology
Map Network Drives in Windows
Last modified 9/26/2024
When you connect to a shared folder on a remote computer, it is known as mapping a network drive. This article describes how to map network drives in Windows 11, Windows 10, Windows 8, and Windows 7.
To map network drives at Illinois State University:
- If you are off campus, you must first connect through VPN.
For information on ISU's VPN, see: VPN at Illinois State University. - You must know the appropriate network path (Typically provided to you by your direct IT support team).
- You must know the username and password to the shared folder, or it must be an open, unprotected shared folder.
- Mapping Network Drives
To map network drives in Windows, do the following:
- If you are off campus and want to connect to a computer or server on campus, you must first connect through VPN.
- Do one of the following:
- Windows 11: Open 'File Explorer', Right-click on 'This PC', and select Map network drive.
- Windows 10: Type 'This PC' into the Windows Search Tool in the lower left-hand corner of your Desktop. Right-click on This PC → Select Map Network Drive.
- Windows 8: On the Start screen, type the word 'Computer'. Right-click on the Computer icon. Then click Map network drive.
- Windows 7: Click Start. Right-click on Computer and select Map Network Drive.
- The Map Network Drive window will appear. (Figure 1)
Figure 1: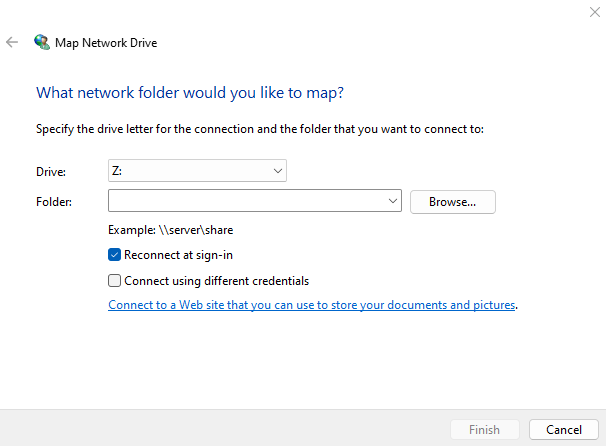
- Select a letter from the Drive drop-down menu (e.g., Z:, Y:, X:, etc), or leave the default letter selected. It does not matter which letter you choose for the drive.
- Enter a Network Path into the Folder field (This path should have been provided to you by your IT Direct Support Team. The Technology Support Center does NOT have access to this path).
5a. Network paths use the following format: \\computername\sharename
5b. Refer to the Network Path section below for more information. - Click Finish.
- If you are prompted to enter a username and password, do so now.
7a. In most cases, your username will be ADILSTU\yourULID (yourULID is what you use to sign into most ISU sites and is the first part of your ISU email address).
7b. In rare cases, your username and password will be assigned to you and will be different from your usual login credentials. - Enter your ULID password and click OK.
- The shared folder will automatically open once it is successfully mapped to your computer. The network drive is also now available by going into Computer and it will appear next to your other drives. When you are done, you can disconnect from the remote computer by right-clicking on the network drive icon and choosing Disconnect.
How to Get Help
To get help accessing a departmental server, contact your department's technical support staff.
Technical assistance is available through the Illinois State University Technology Support Center at:
- Phone: (309) 438-4357
- Email: SupportCenter@IllinoisState.edu
- Submit a Request via Web Form: Help.IllinoisState.edu/get-it-help
- Live Chat: Help.IllinoisState.edu/get-it-help