Technology
Copying Content from Another Canvas Course
Last modified 11/1/2024
You can copy course content such as assignments, modules, pages, and discussions from previous Canvas courses into existing courses. You can also bulk migrate quizzes. You will only be able to copy content from a course which you are listed as an instructor.
Important: When copying course content from a previous semester course, if a Missing policy (as in missing submissions) is set and due dates are left the same, Canvas will enter in scores based on the missing policy for any past-due assignment.
For example, if you copy a course that had a missing assignment policy where any missing assignments automatically received score of zero, and the due dates stay set as those from the previous semester, then students in the new course will immediately have zeroes entered in for those assignments. Once scores have been entered in, turning off the missing policy, updating the due dates, or unpublishing the assignments will not remove or adjust the scores.
How to Prevent Missing Policy Issues in a Copied Course
The information below discusses how to prevent missing policy issues in a copied course before you import the course. Another option would be to adjust or remove event/due dates from the original course during the import; which is discussed in the section of this article labeled Copy Course Content into Another Course.
- Uncheck missing policy before importing
- Open the course you are copying content from (your previous semester course).
- Click on Grades to access the Gradebook.
- Click the gear icon on the upper righthand side (Figure 1):
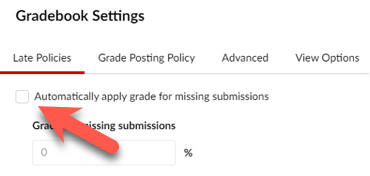
Figure 1: - Deselect the Automatically apply grade for missing submissions (Figure 2):
Figure 2: - Click the Apply Settings button at the bottom of the screen (Figure 3):
Figure 3:
The course may now be copied without the missing policy applied.
How to Remove Scores Set by the Missing Policy in Already-Copied Content
If you imported course content with the previous semester dates still set and the missing policy applied, you can quickly remove the scores it causes to be entered in by one of the methods described below:
- Removing Scores per Assignment
If you only have a few assignment impacted by this, the quickest way to remove scores, is by using the set default grade option:
- Navigate to Grades.
- Select the three dots next to the title of the assignment name for which you want to clear the scores.
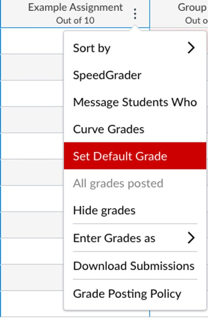
- Choose Set Default Grade (Figure 1):
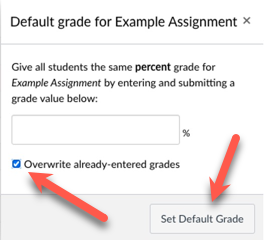
Figure 1: - In the box that pops up, leave the Score field blank, check the box next to Overwrite already-entered grades and click on Set Default Score to save the change (Figure 2):
Figure 2: - Repeat for each assignment for which you would like to remove scores.
Note: It may take a moment for the scores to adjust. Refresh your page to get the most up-to-date view.
- Removing Scores for Entire Gradebook
If you have many assignments that have scores entered in, you can export your gradebook in order to clear all scores at once:
- From Grades, choose Export > Export Entire Gradebook.
- Open the downloaded file in Excel.
- Remove all scores entered in for assignments.
- NOTE: Do not edit the first four or five columns with student information or the first few rows with assignment data, but you can remove all data entered in between with scores.
- Save the spreadsheet.
- Navigate back to Canvas Grades, and select Import.
- For Choose File, upload the edited spreadsheet.
- Select Upload Data.
- You will see student names and columns for each assignment, showing that the grade has changed from '0' to blank.
- Click Save Changes to update the gradebook.
Copy Course Content into Another Course
The instructions below explain how to copy your course content:
- Open the course you want to add content to
- Select Settings from the Course Navigation Menu
- Select the Import Course Content link from the right-hand side.
- In the Content Type drop-down menu, select Copy a Canvas Course
- In the Search for a course drop-down menu, select the course you would like to copy from
- You can also type in your course name in the "Course name" box to search for a course
- Select the Include completed courses checkbox to include completed courses in your search
- Select course content
- Select All Content to import all content from a course
- Select Select specific content; if you want to select specific content
- Checkmark the Adjust event and due dates box to adjust or remove the due dates to specific assignments and course events.
- Click the Adjust events and due dates This will then pull up “Beginning date” and “Ending date” boxes.
- Adjust Course Event and Due Dates
- Click the Adjust events and due dates This will then pull up “Beginning date” and “Ending date” boxes (Figure 1):
Figure 1: - Click Shift dates.
- Adjust the Beginning date to the date of the first assignment or event that has a date in your course you’re importing. You can also click on the calendar icon to select the date.
- Adjust the change to date to the new date you want the first assignment due.
- In most cases you will leave the Ending date line blank (Figure 2):
Figure 2:
Canvas will take the new dates and distribute all assignments with due dates as evenly as possible across the course and keep them due on the same day of the week as the original course. Once the course is imported, you can easily confirm and adjust any assignment dates using the Calendar.
Create Substitution Dates
You can also define day substitutions to adjust for changing class schedules, such as moving all assignments on Mondays to Tuesdays. Follow the steps below to create as many substitutions as necessary. Canvas will take the date substitutions and adjust assignment with due dates appropriately across course dates.
- Click on +Substitution.
- In the Move from field, select the day of the week.
- In the To field, select the new day of the week for the substitution.
- To remove a substitution, click the Remove icon (the x that comes after the To date).
- Select Import.
Remove Dates
To remove all associated due dates in the course, select Remove dates.
NOTE: Dates will be removed from the following features:
- Assignments (due, availability, and peer-review dates)
- Announcements (delayed post dates)
- Quizzes (due, availability, and show correct answers dates)
- Calendar events (start and end dates)
- Modules (unlock dates)
- Files (availability dates)
- Click the Adjust events and due dates This will then pull up “Beginning date” and “Ending date” boxes.
- Select the Import button
- You should see the current jobs section below, which will show you the progress of the import.
- If you selected Select specific content, the progress will show as Waiting for select, which means you need to select the content you want to import.
Important
Importing the same course content more than once will overwrite any existing content in the course.
- Copying your Home Page
If you choose to copy All Content from your course, you will copy your Home Page, but it will not override the template homepage of the course you copied it to; the Home Page is in the Pages area of your copied course. Follow the instructions below to move your copied Home Page to the Home Page section of the course:
- Select Pages from the Course Navigation Menu
- Select View All Pages to view a list of all course pages
- Locate the your Copied Courses Home Page
- Select the three more dots options icon to the right
- Select Use as Front Page
- You should now see a gray Front Page tag under your the name of your home page on the list
- Alternatively you can select your old front page from the list of pages (Number 2, above)
- Then select the three more dots options icon next to the Edit button
- And select Use as Front Page from this area.
- Copying Some Content
The Copy To function explained at the beginning of this article is also a good tool to use if you want to copy a few select items into another course. It does not have to be used to copy everything.
- Select the Assignments, Quizzes, Modules, Pages, etc. from the course navigation menu
- Select the three more dots next to the item you want to Copy To another course
- Select Copy To
- Type the name of the course or select the Course from the drop down menu that you want to Copy To
- You can choose to select a module to copy the item to if you want
- Then choose the place you want that copied item to go to within that module.
- Select the Copy button once you've selected all the options you want to
- The item will now be copied to the other course
How to Get Help
Technical assistance is available through the Illinois State University Technology Support Center at:
- Phone: (309) 438-4357
- Email: SupportCenter@IllinoisState.edu
- Submit a Request via Web Form: Help.IllinoisState.edu/get-it-help
- Live Chat: Help.IllinoisState.edu/get-it-help