Technology
Transition Your Video Files to Canvas Studio
How to Move Video Files from Microsoft Stream or ReggieNet to Canvas Studio video available on the Center for Integrated Professional Development YouTube Channel.
Download a transcript for this video in Adobe PDF or print a copy.
Canvas Studio will replace Microsoft Stream (now called Stream Classic) as the officially supported, secure video system for teaching at Illinois State.
This guide includes instructions for backing up videos stored in Stream Classic or ReggieNet itself. It also shows instructors how to import those videos into Canvas Studio for use in the fall of 2023 or beyond.
- Downloading from Stream (Classic)
Note:
If you already have your video files available to you on your computer or OneDrive, you can skip this step, and go to Importing Videos into Canvas.
Go to your Stream (Classic) account.
After logging in, go to My Content > Videos (to see all your videos) or Groups (to see videos associated with individual groups/classes). (Image 1)
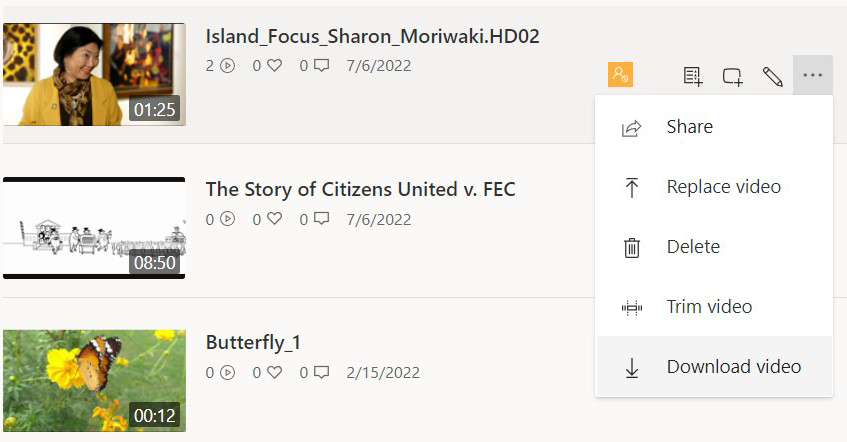
For any of the videos you want to move over to Canvas, click on the (•••) icon on the far right of any video and select Download video. (Image 2) Unfortunately, videos have to be downloaded one at a time from Stream (Classic). As you are downloading all your videos in preparation to bring them to Canvas, please consider organizing all your files in folders (and subfolders by course if necessary) in one place, whether on your computer or on OneDrive (preferred).
Image 1:
Image 2:
- Importing Videos into Canvas
- Log into your Canvas account.
- Click on the Studio icon in the black general navigation strip on the left to add videos to your Canvas Studio Library. (Image 1)
- Click the Add button in the upper-right corner to upload all your videos at once or one at a time.
- Choose Browse Files.
- Navigate in the open dialog box to where your videos are.
- Choose a file or shift-click/control-click to select multiple files.
- Click Open.
All your selected files should begin uploading into the Library. You can also add YouTube or Vimeo videos into your Library using the same method by adding a URL on the right area after clicking the Add button (it will embed them there for use; they will not be there as files). (Image 2) These videos will have the YouTube or Vimeo icon to the left of your name to signify they are being hosted on that platform.
Image 1:
Image 2:
- Adding Closed Captioning
To add closed captioning to your videos:
- Hover your mouse over each video once they appear in your library
- Click to go to the hosting page.
- Choose the Captions tab under the video on each video’s page. (Image 1)
- Click the Request button (Image 2)
- Choose your language
- Click Request again.
You’ll get an email when the captions are complete.
To edit and enable your captions:
- Click back onto the Captions tab for each processed video.
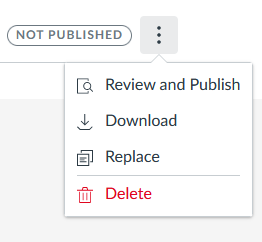
- Click the three vertical dots on the right.
- Choose Review and Publish. (Image 3)
This will bring you to the editor where you can fix any mistakes the speech-to-text engine has made.
Image 1:
Image 2:
Image 3:
- Sharing Videos in Canvas
Sharing your videos with students can be done by inserting them directly from your Studio Library. To share directly, you have to be in the Rich Text Editor.
Note:
For accessibility reasons, always use the embed code from YouTube, Vimeo, or any other external video source and not from your Studio library.
Image 1:
- Click on the Canvas Studio icon. (Image 1)
- Find your video in the column of videos that appears.
- Hover your mouse over it.
- Click Select.
This list defaults to the most recently uploaded videos at the top, but can also be searched by file name. This is one reason why being mindful of the names of your files can be important. Your video will be embedded at your cursor.
Embedding a video using embed code from Canvas Studio is typically unnecessary, but to do so:
To embed a video:
- Go to your Studio Library.
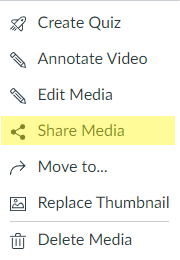
- Click the three vertical dots next to the desired video’s title. (Image 2)
- Select Share Media.
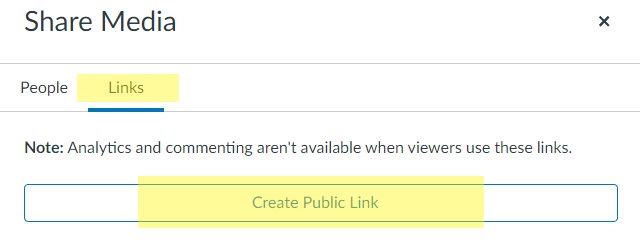
- Click on the Links tab.
- Select Create Public Link.
- Click on your embed code.
- Click Done.
Image 2:
To add embed code in the RTE of Canvas, click the three vertical dots on the end of the toolbar (yellow highlight] and then click on the Embed cloud button (green highlight)
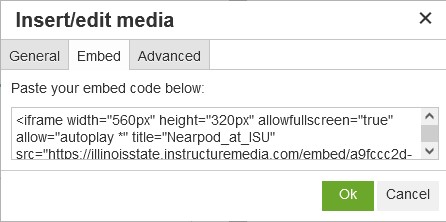
- Click the Insert/edit Media button.
- Click on the Embed tab. (Image 3)
- Paste your embed code there.
Image 3:
- How to Add Video Directly to a Module
If you want to add a video from Canvas Studio directly to a module as a stand-alone item:
- Find or create the Module you’d like to add your video to.
- Click on the Add (+) button (Image 1)
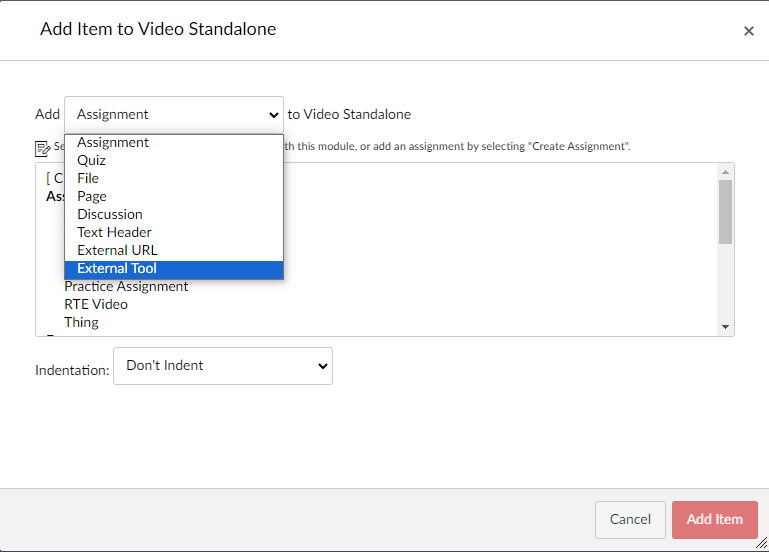
Image 1: - Select External Tool from the pulldown menu. (Image 2)
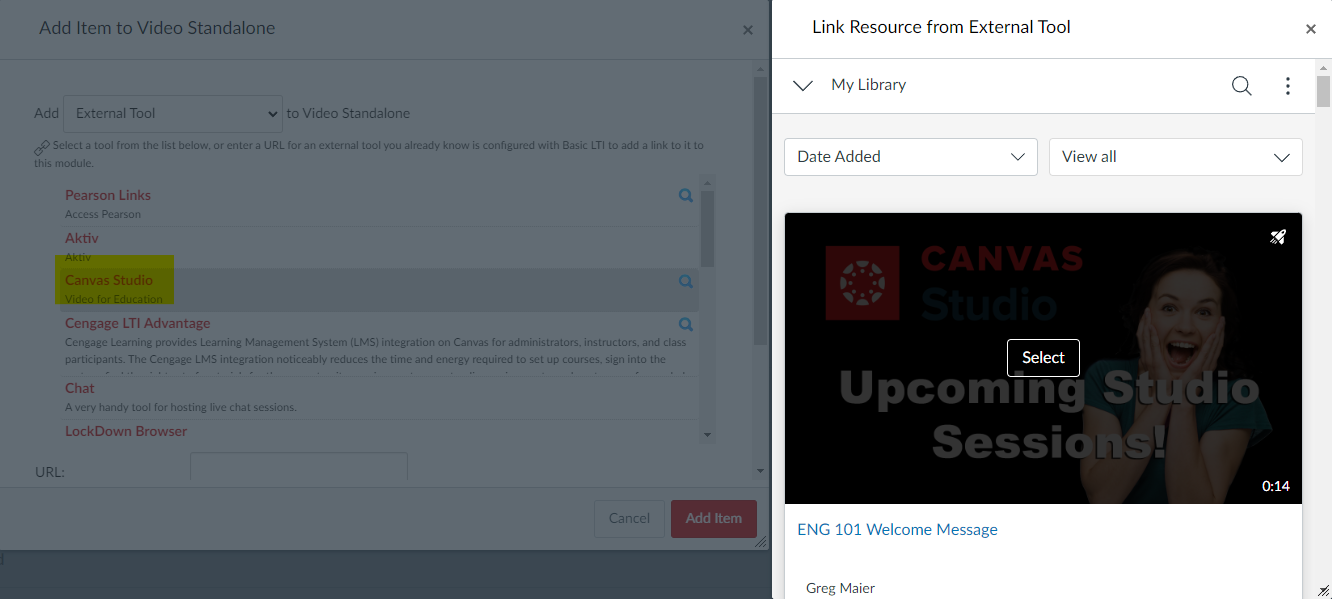
Image 2: - Click on Canvas Studio, then find and Select your video from the column of videos. (Image 3)
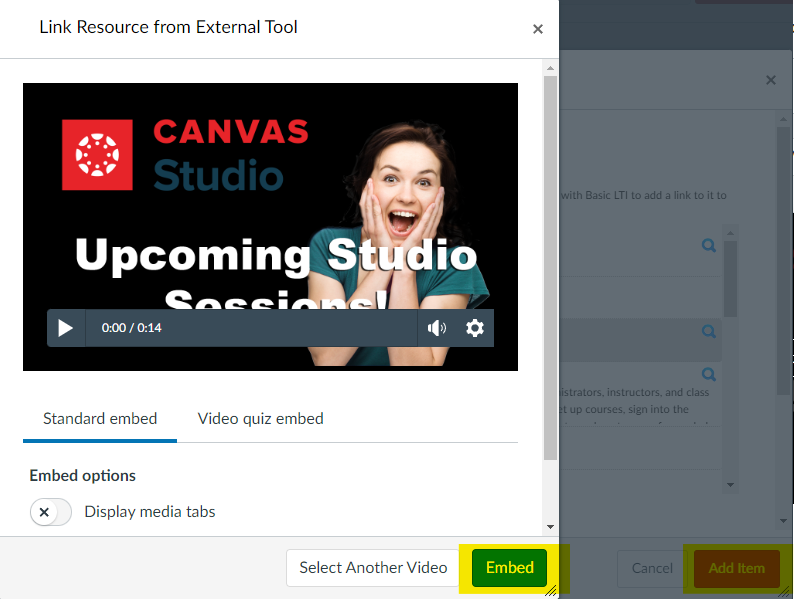
Image 3: - Set your options as needed, then click Embed, then Add Item. (Image 4)
Image 4: - Done. The title of the video should appear attached to that module.
- Permissions in Canvas
Unlike Stream, permissions do not have to be granted in Canvas Studio. If a student is a member of the Canvas course you’re using to host the video, they will be able to watch the video. If they are not, they won’t.
- Find the video in your Canvas Studio library.
- Click on the three dots next to the video’s title.
- Select Share Media. (Image 1)
- Click on the Links tab. (Image 2)
- Select Create Public Link. (Image 2)
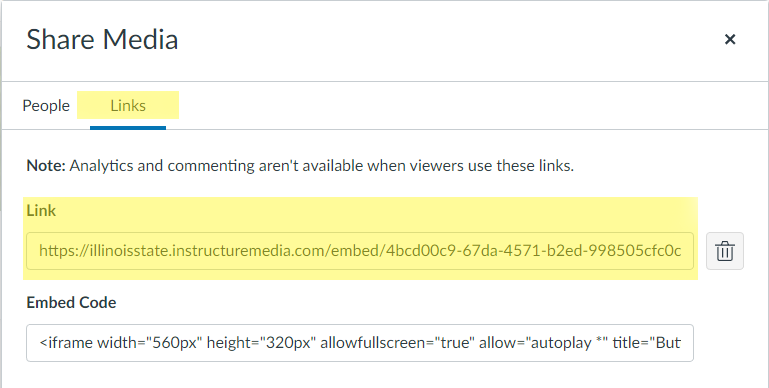
- Copy and share the “Link” URL. (Image 3)
Image 2:
Image 3:
Image 1:
How to Get Help
Technical assistance is available through the Illinois State University Technology Support Center at:
- Phone: (309) 438-4357
- Email: SupportCenter@IllinoisState.edu
- Submit a Request viaWeb Form: Help.IllinoisState.edu/get-it-help
- Live Chat: Help.IllinoisState.edu/get-it-help

