Technology
Teaching with Zoom
Zoom is Illinois State University's video conferencing system. It allows students to remotely join a face-to-face class session or instructors to host a class session entirely online. Zoom also allows students to collaborate with each other remotely for group assignments.
Getting Started
All members of the University Community, including faculty, staff, and graduate and undergraduate students have access to Zoom Pro accounts, which provides additional tools for facilitating online learning and unlimited meeting times. Make sure you sign in to IllinoisState.Zoom.us once to activate your license before using Zoom for the first time.
Instructors also have access to Zoom's cloud recording feature.
Important Reminders
User authentication for Zoom meetings
Instructors are encouraged to enable the "Only authenticated users can join: ISU Login" option when setting up meetings. This setting provides additional security, allows for accurate attendance reports, and is critical for pre-assigning Breakout Rooms.
Students will be prompted to log into Zoom using their University credentials (if they are not already). They should select the "Sign In with SSO" (Single Sign On) option. Share this handout with students for complete instructions.
Prepare to teach
Instructors need to make decisions about how they want to conduct a particular online class session before creating the meeting. In addition, some of Zoom’s advanced features, such as Polls and the pre-assignment of Breakout Rooms, need to be prepared before you begin a meeting.
- Use Zoom in Canvas
The Zoom tool is available by default in all Canvas courses. If you do not intend to use Zoom through your course, you can hide the tool from students by editing the course navigation
- Create an Online Meeting
To create a new Zoom meeting in Canvas, select the Zoom on the Course navigation, select Schedule a New Meeting, and enter your desired date/time/meeting duration. Double-check that the time zone is correct.
Recommended meeting settings
- Waiting Room – this places students in a virtual waiting room until you give them permission to enter the class. Consider using this if you wish to use the same session to meet with students one-on-one (for example, hosting virtual office hours), or if you wish to take attendance as you "let" students in to the meeting.
- Audio – set for “Both” to allow students more options to participate.
- Enable Join Before Host – this function allows students to connect to the meeting without you being online. This allows them to become familiar with the virtual environment before instruction begins. Combined with the Waiting Room setting, this places students in the Waiting Room without you needed to start the meeting first.
- Mute Participants Upon Entry – this reduces environmental noise at the start of the session. You will have the option to unmute individuals or all students when you need to.
- Only authenticated users can join – this requires students to enter their University credentials to join the session. In addition to ensuring high security encryption and preventing uninvited attendees from joining, it allows for easier attendance taking and the use of the pre-assigned Breakout Rooms function.
When you have configured your meeting, select Save. Students will see a list of available meetings in Canvas.
After creating a meeting in Canvas, you can edit polls and pre-assign breakout rooms by editing the meeting through IllinoisState.Zoom.us.
- Creating Polls
If you plan to use Zoom's Polls function during a meeting, set them up in advance:
- Create meeting and save it (or select a previously created meeting from the list) through IllinoisState.Zoom.us.
- Scroll down to the bottom of the page.
- You'll see a button to Add a poll. (Image 1)
Image 1 - Select Add
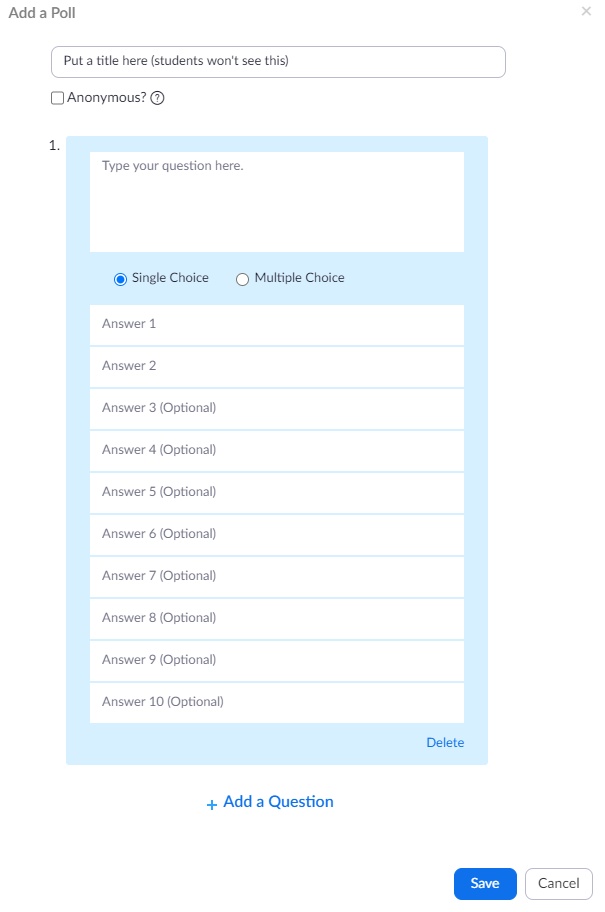
- On the pop-up screen, enter your poll information. Single-Choice questions allow for only one answer. Multiple Choice questions allow for more than one answer.
- "+ Add a question" will allow you to create additional questions which appear on the same poll screen during the meeting - students will have to answer all of the questions before they can submit their responses. Skip this and select "Save" is you want to show results and discuss them before asking another question.
- "Save" will save the poll. (Image 2)
Image 2 - You can add additional polls be repeating this process.
For more information on creating polls, see Zoom's support site.
- Pre-assigning Breakout Rooms
Zoom's Breakout Rooms allow instructors to place students into small work groups during a class. Group can be created randomly during meetings, but they can also be pre-assigned. This pre-assignment must be done before the session is started.
See Zoom's support site for step-by-step instructions.
Important notes
- Zoom relies on participants' email addresses in order to place them into Breakout Rooms. In order to successfully use this function, you will need to ensure students are logged into the Zoom meeting using their Illinois State University credentials. Do this by turning on the "Only authenticated users can join" option in the meeting settings.
- Even if you have pre-assigned students, they will not be placed in their appropriate Breakout Room if they join class after you started the Breakout Room process.
- If you opt to pre-assign Breakout Rooms and turn on the "Only authenticated users can join" setting, guest speakers or anyone else who does not have an Illinois State University login cannot join the meeting.
- Creating Virtual Office Hours
The Zoom interaction in Canvas now makes it possible to use the same recurring meeting across multiple course sites.
To learn how to easily set up recurring office hours, please consult this guide.
- Using a Virtual Background
The Center for Integrated Professional Development has created a set of virtual backgrounds for instructors. Each features the ISU seal and official University logo. To download, left-click to open the image and then save it to your computer (right-click and select "Save image as...").
Zoom Backgrounds |
|
|---|---|

|

|

|

|
Prepare to record your class
Instructors may want to record a class session for the benefit of those who are absent, or in cooperation with Student Access and Accommodation Services to meet the special needs of a student. Providing captions or transcripts of recordings is an important part of the University's mission and core values. The Zoom Cloud recording feature can help to achieve this.
Enabling audio transcription in Zoom
View and share cloud recording transcripts in Zoom
Conduct your class
As the instructor, you are the "host" for the meeting. While it is possible to participate in a meeting using a mobile device (such as an iPhone) with the Zoom app, we recommended that hosts use a Windows or Mac laptop or desktop computer for maximum performance.
Note: Instructors who intend to record material or host online sessions in classroom spaces should first consult Learning Spaces and Audio/Visual Technologies to ensure that equipment is properly configured.
- Checking your audio and video hardware
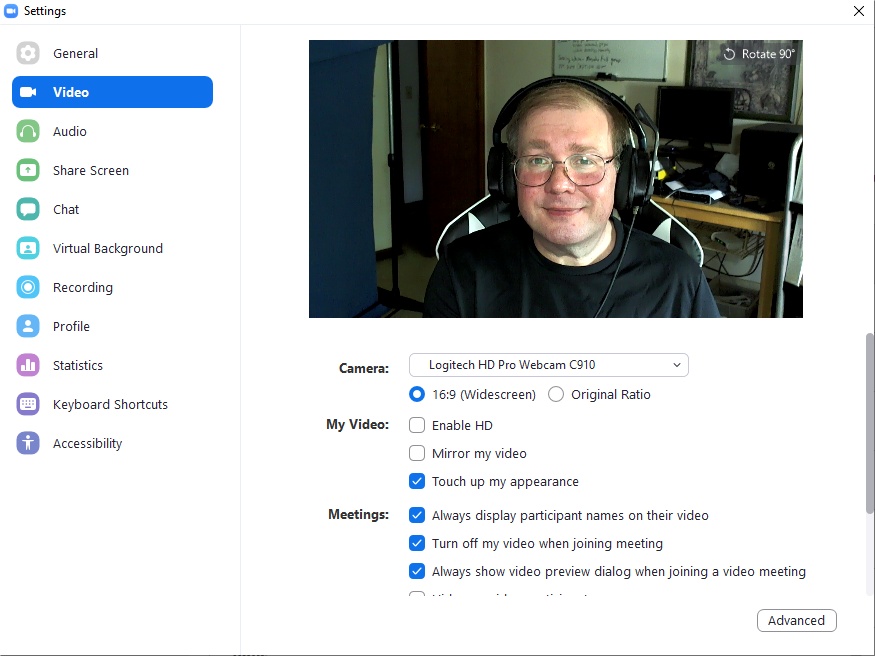
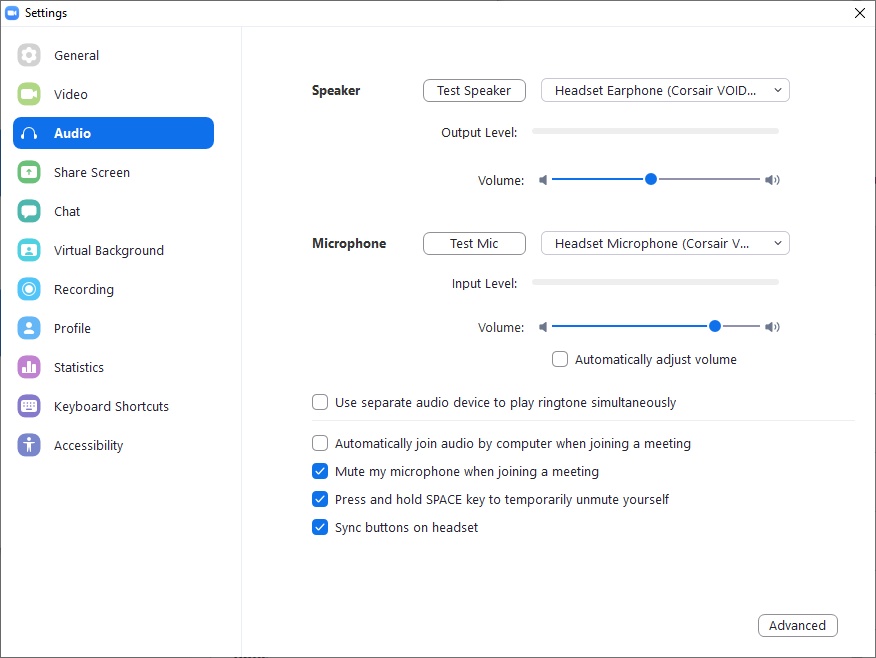
It's a good idea to check you camera and microphone before starting a Zoom meeting. On a PC or Mac computer, launch the desktop app and select the "Settings" (the gear icon) on the Home screen.
Select Video to see a preview image and adjust settings as needed. (Image 1)
Image 1
Select Audio to test both your speakers and microphone. (image 2)
Image 2
For information about adjusting media settings during a meeting or on other devices (such as smartphones), see Zoom's audio and video support pages.
- Launching the meeting
To begin a session, select the Start button next to the meeting name in the Canvas Zoom tool. Students will see a Join button instead. Participants can alternatively join using the meeting's webs link. In any case, users may be prompted to install or update the Zoom desktop app before entering the meeting.
Tutorial Video: Joining a Meeting
Tutorial Video: Testing computer or device audio
Basic Meeting Controls
Basic meeting tools include:
- microphone and camera control
- a participants list showing who has joined the meeting
- a chat window to allow for typed questions and sharing files or links
Tutorial video: Host and Co-Host Controls in a Meeting
- Live Transcription
Instructors can turn on Live Transcription during Zoom meetings. This will automatically generate real-time text of what is being spoken on screen.
Please note: Live Transcription must be started by the meeting host during each meeting; it cannot be set to begin automatically. In addition, should you desire to save the transcribed text, you must do so manually before closing the session.
- Recording
Local Recording vs. Cloud Recording
Instructors can record Zoom meetings on their local machines or in the Zoom Cloud. Since Cloud recordings need to be uploaded to Canvas Studio for distribution to students, it is strongly suggested that instructors choose local recording when possible.
Learn more about Canvas Studio.
Local recordings are:
- Saved on your Windows or Mac computer in your Document folder
- Need to be processed by your computer before they are available (you will see a progress bar appear after the meeting is ended)
- Saved as MP4 video files
Cloud recordings are:
- Saved to the Zoom Cloud, accessed by going to IllinoisState.Zoom.us and selecting the "Recordings" tab
- May not appear right away, as they will need to be processed
- Include a separate transcription file for captioning purposes
- Automatically deleted after 30 days
For more information on recording to both locally and to the cloud, see this comprehensive help desk article.
- Managing students and the Security button
Using Canvas is the best, most secure way to schedule online Zoom meetings with students. Instructors are encouraged to avoid emailing or posting Zoom links outside of Canvas when possible. There are additional strategies and tools available to keep online learning spaces safe and welcoming:
- Chat
Zoom's in-meeting Chat feature allows the instructor and participants to exchange text messages and share links and files during a meeting.
Please note: Links pasted into Zoom chat may not work properly for students using assistive technology, such as screen readers. in addition, file sharing may not work for some students using smartphones or tablets.
Chat features
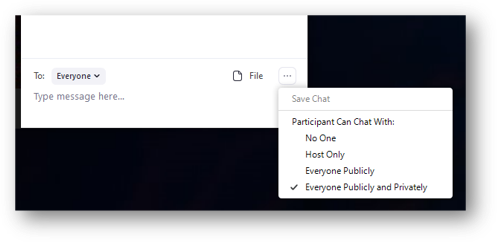
- As host, you can chat with Everyone or specific users using the drop-down To: field.
- Select the "File" icon to load a file (e.g., a document) into chat that everyone can download.
- Select the • • • icon to control with whom students can chat (Image 1)
Image 1
For additional help using Chat, including with mobile devices, see Zoom's help page.
- Share Screen
Share Screen allows your students to see a PowerPoint presentation, website, document, or any other type of information you choose to display on your desktop.
Share Screen features
- You can share either everything on your screen, a portion of your screen, the output of a specific program (such as PowerPoint), or use the Whiteboard tool.
- Hosts also have the option of sharing sound from the computer and optimizing shared videos for streaming.
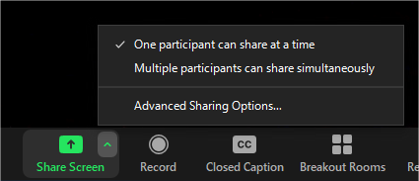
- To allow others to share their screens during a meeting, select the "up" chevron next to the Share Screen button and select "Advanced Sharing Options..." (Image 1)
Image 1
For detailed instructions on using the Share Screen feature, including on mobile devices, see Zoom's help page.
- Share a Document Camera
Several classrooms at Illinois State include document cameras at the instructor’s presentation station. These cameras can be shared with students attending remotely through a Zoom meeting, allowing instructors to showcase passages of text, diagrams on paper, or to do demonstrations under the camera.
Use this method to share a secondary camera while still allowing the presenter to appear on the primary camera:
- Start your Zoom meeting as normal
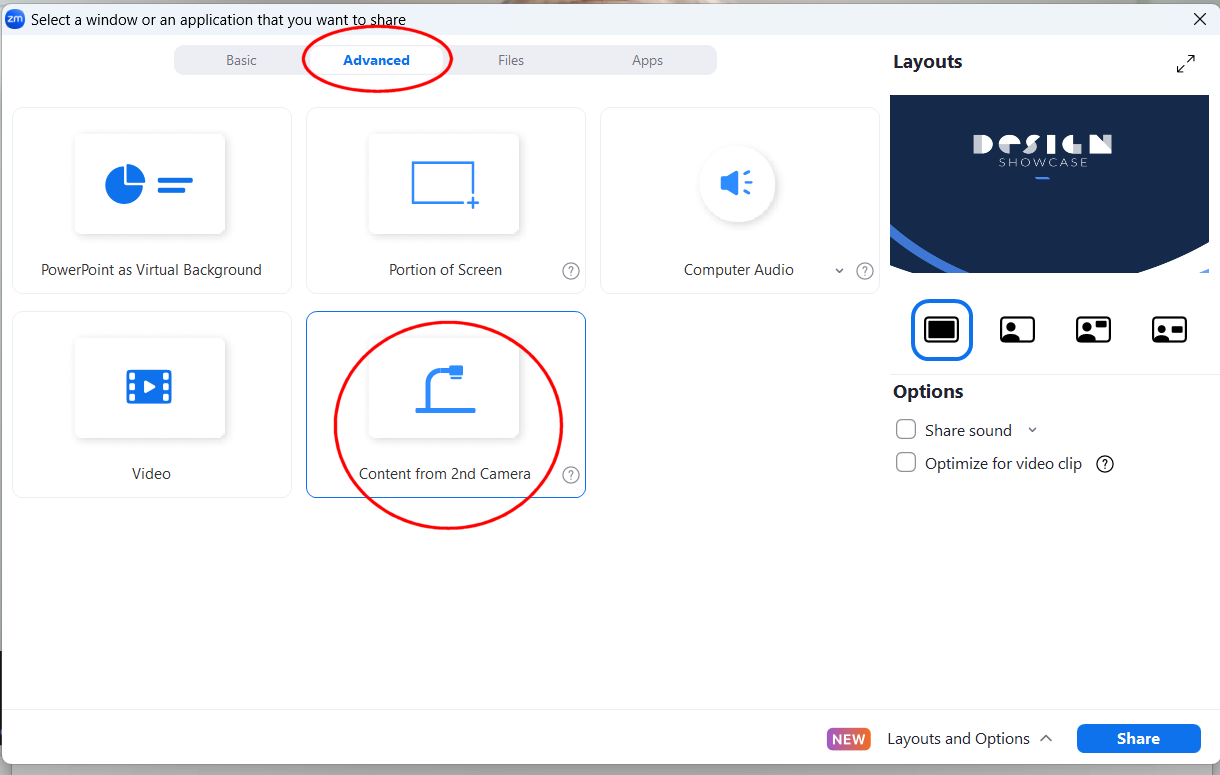
- Select “Share Screen” from the main toolbar. (image 1)
- On the Share Screen menu, select “Advanced”Window for sharing document camera in Zoom
- On the Advanced menu, select Content from 2nd Camera (Image 1)
To stop sharing the second camera, select “Stop share” on the main toolbar.
Image 1
- Polls
Zoom's Polls function allows for simple surveys to be used in your meetings.
Polls features
- Polls in Zoom are limited to multiple-choice questions allowing for either single or multiple answers.
- Polls should be made through IllinoisState.Zoom.us before the start of the meeting (see these instructions).
- Select the Polls button from the main toolbar to call up your pre-created surveys during a meeting.
- You can use pre-created Polls in any order. You can scroll through all of your polls by selecting the drop-down icon (v).
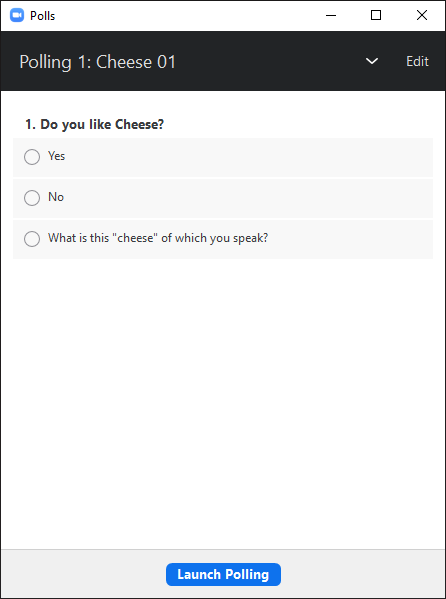
- Select "Launch Polling" to put your poll "in the field" (Image 1)
Image 2 - You can follow the progress of your poll as it is bring used by the students
- Only the host (you) or co-hosts can see the progress (Note: Neither hosts or co-hosts can submit answers).
- Select "End Polling" when you are satisfied with the returns
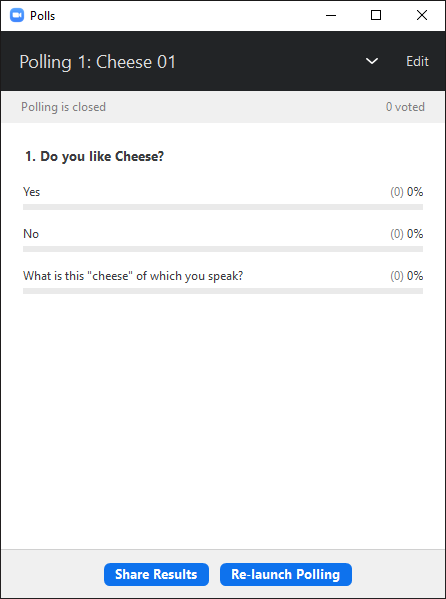
- After you've ended the poll, select "Share Results" to reveal them to your audience. (Image 2)
- Re-launching the poll will erase the previous results. (Image 2)
Image 2
For more information on using Polls, see Zoom's help pages.
- Breakout Rooms
Zoom's Breakout Rooms allow instructors to place students into small work groups during a class.
Breakout Room features
- Launch the Breakout Rooms feature by selecting the Breakout Rooms button on the main toolbar.
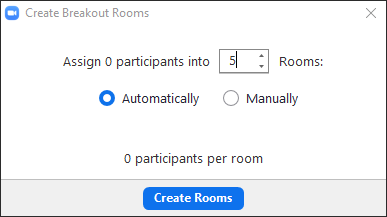
Image 1 - Automatically will randomly assign students to groups. Manually allows you to control who is put into which group.
- Use the number box to determine how many groups (Breakout Rooms) you wish to have.
- Select "Create Rooms" to go to the next screen. (Image 1)
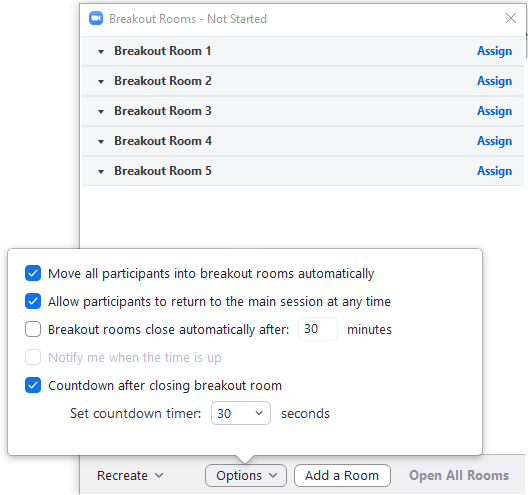
Image 2 - Select "Options" to configure the rooms (Image 2):
- You can allow participants to rejoin the main meeting at any time.
- You can set rooms to close after a specific time and give a warning announcement (up to 120 seconds) before.
- Select "Open All Rooms" to move students into their assigned breakout rooms.
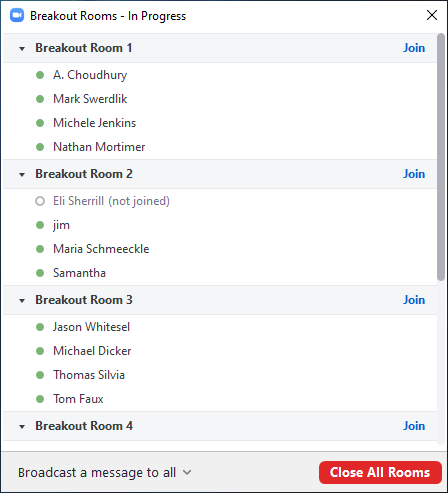
Image 3 - While Breakout Rooms are active, you can (Image 3):
- send a text message to all rooms
- join any Breakout Room to interact with students
- close Breakout Rooms manually
- After a breakout session, you have the option to start the rooms again with the same participants.
For detailed instructions on using Breakout Rooms, see Zoom's help page on Managing Breakout Rooms.
After your class
After ending your class session, Zoom provides a number of different data sets which could be of use. Please note that you may experience a delay of a few hours before all of these options appear online.
- Accessing attendance reports
Zoom will store data online about those who participated in your meetings. These can be exported as CSV files, which can be opened in Microsoft Excel or Apple Numbers.
Accessing reports
- Sign in to IllinoisState.Zoom.us.
- Go to "Reports"
- Select "Usage"
- Specify a date range and select "Search"
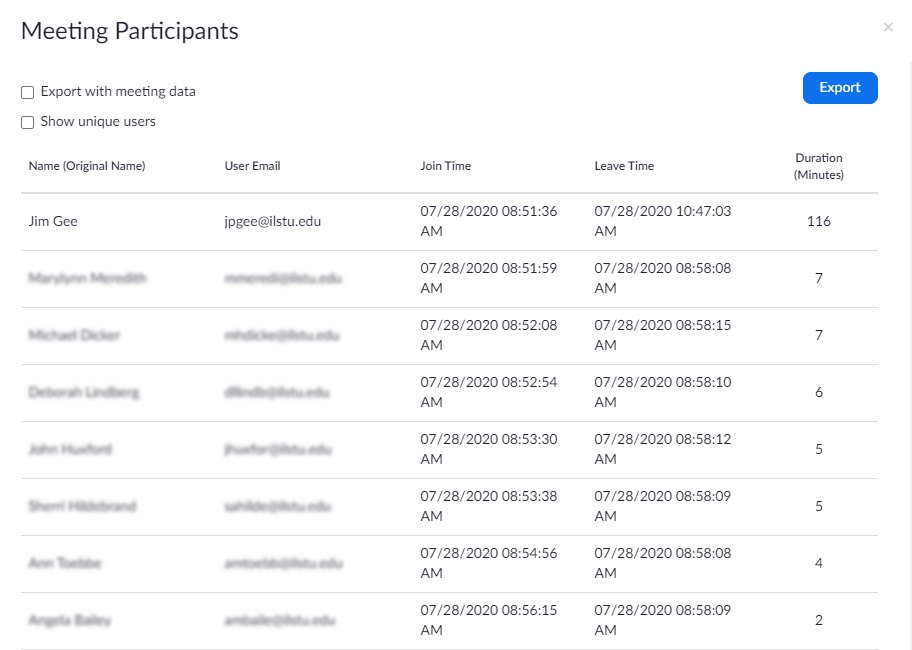
Image 1 - Under the Participants heading, you'll see a number. (Image 1) Select it to go to the next screen.
Image 2 - Check "Export with meeting data" to include the meeting date/time and other information in your spreadsheet.
- Check "Show unique users" to consolidate the list. This will display the total amount of minutes spent in the meeting by each participant.
- Select "Export" to download the information.
Notes
- Meeting data is compiled on Zoom's servers, so it may take a few hours after the end of the meeting for reports to be available.
- If your meeting does not show up see the Get Help section below on how to contact the Technology Support Center
- Accessing and sharing recording and chat logs
Local recordings
Video, audio, and chat logs (in text-file format) can be found on your local machine's Documents folder. The will appear in a sub-folder called "Zoom."
Cloud recordings
To access video, audio, chat logs, and automatically generated transcripts recorded on the Zoom Cloud:
- Sign in to IllinoisState.Zoom.us
- Select "Recordings".
- Select the desired meeting from the list to see all the files available for download.
Note: Users with Zoom Cloud access should receive email notifications when recordings and transcripts are processed and available for download.
For more on accessing recordings, see this help desk page.
- Accessing Polls data
- Sign in to IllinoisState.Zoom.us.
- Go to "Reports"
- Select "Meetings"
Image 1 - On the next screen, select "Poll Report" and specify a date range
- Select "Search"
- Find your meeting on the resulting list and select the "Generate" hyperlink to download the poll data in a spreadsheet.
Advanced Zoom Settings
You can control many default settings online, making it easier to create meetings. To access settings:
- Go to IllinoisState.Zoom.us
- Sign In with your University credentials
- Select Settings
Please note: Some settings are controlled by system administrators and may not be changed by users.
How to Get Help
Zoom provides a number of online resources, ranging from brief video introductions to in-depth, step-by-step instructions.
- Getting Started with Zoom (30-minute webinar recording)
- Zoom Meetings Training (60-minute webinar recording)
- Zoom Meetings for Education (45-minute webinar recording)
- Tips and Tricks for Teachers Educating on Zoom (PDF document)
Technical assistance is available through the Illinois State University Technology Support Center at:
- Phone: (309) 438-4357
- Email: SupportCenter@IllinoisState.edu
- Submit a Request via Web Form: Help.IllinoisState.edu/get-it-help
- Live Chat: Help.IllinoisState.edu/get-it-help

