E-Commerce
Terminal & PIN Pad Guide
Last modified 3/19/2024
This guide outlines the payment processing options for A80 terminals paired with a Q25 PIN pad.
- Run a Transaction
Multi-merchant terminals must verify that the correct merchant is selected.
- Open the payment processing app from the terminal's home screen
- Navigate to the 'Credit' tab
- Click the 'Sale' button
- Enter the transaction amount and press 'Confirm'
- Follow on-screen instructions for customer payment on the PIN pad
- Prompt the customer to swipe, tap, or insert their card
- The merchant receipt will print first
- Confirm the customer receipt prints when prompted
- Re-Print a Receipt
Re-Print Last Receipt
- Open the payment processing app from the terminal's home screen
- Navigate to the 'Func' tab
- Select 'Re-Print'
- Choose 'Print Last' to print the most recent receipt
Re-Print Any Receipt
- Open the payment processing app from the terminal's home screen
- Navigate to the 'Func' tab
- Select 'Re-Print'
- Choose 'Print Any'
- Enter the transaction number for the receipt that needs to be reprinted
- Void a Transaction
- Open the payment processing app from the terminal's home screen
- Verify you are in the 'Credit' tab
- Select 'V/Sale'
- Enter the transaction number you wish to void
- Select the 'Confirm' button
- Confirm the Void Sale receipt prints when prompted
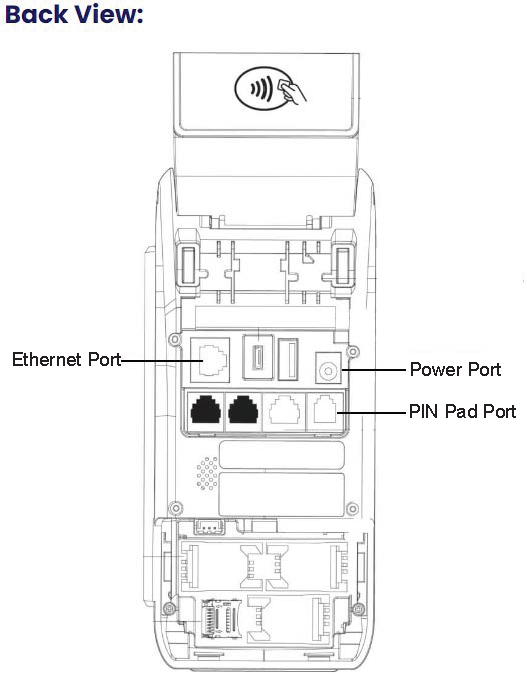
- Setting Up the Terminal
Note: Ensure the Q25 PIN pad is connected to the terminal before plugging in the terminal's power supply.
Plugging in the terminal power supply before connecting the PIN pad may damage the PIN pad.
ALWAYS PLUG-IN POWER LAST WHEN SETTING UP.
- Verify that power is NOT plugged into the terminal
- Plug in the Ethernet connection (refer to the graphic)
- Connect the PIN pad to the terminal (refer to the graphic)
- Connect power to the terminal (refer to the graphic)
When Unplugging the Terminal:
Unplug the terminal's power supply first to prevent accidentally damaging the PIN pad.
- Closing a Batch
Note: Merchants are required to close a batch at the end of the day to submit all transactions for processing. Terminals will batch automatically if they remain plugged in overnight.
- Open the payment processing app from the terminal's home screen
- Go to the 'Func' tab
- Select 'Batch'
- Choose 'Batch Close'
Confirm the Batch receipt prints when prompted
- Processing a Refund
- Log into https://magic.collectorsolutions.com/magic-ui/Login/illinois-state-university with a Merchant Refund Account authorized to perform refunds
- Obtain the transaction date and identifying information from a receipt or a printed report
- Click the 'Payment Search' option at the top of the webpage
- Enter one of the following into the 'Search Text' box:
- Reference Number
- Confirmation Number
- Authorization Code
- The last four digits on the credit card
- Transaction Amount
- Advanced Search Options (if no Reference Number):
- Click 'Show Advanced Search Options'
- Change 'Type of Criteria' based on entered data
- Set 'Date From' and 'Date To' to the day of the transaction
- Complete the search by clicking the 'Search' button
- If the correct transaction is not found, consider the following:
- The transaction may not be in the system yet (8 AM the day following batch close)
- The transaction may belong to another merchant account
- There may be an error in your search criteria
- Once the correct transaction is found, select the 3-dot button in the 'options' column on the transaction
- Click the 'Process Credit' button
- Type the refund amount (up to the original transaction amount) in the “Amount To Credit” column
- Add notes in the “Notes” field to document the reason for the refund (e.g., “Charged 100.00 instead of 10.00”)
- Click the “Process Credit” button
- Use the 'Print Receipt' or 'Email To' buttons at the bottom of the page to send the customer the receipt or keep a copy for your records